For US controllers and finance leads who want every month to close the same calm way, from entry to board report.
Last reviewed: 2 November 2026. Product details reflect this review date. Availability and behavior can vary by account, role and release.
The NetSuite record to report process takes each transaction from the subledgers into the general ledger, then through journal approval, reconciliation, period end adjustments, the Period Close Checklist and reporting. Run it in six stages. Give each stage one owner, one NetSuite screen and one control, and your close becomes repeatable and easy to audit.
- Record to report is the whole flow from entry to report. The month end close is one part of it.
- Name one owner per stage, and keep the person who prepares an item apart from the person who approves it.
- Turn on journal approval and let the Period Close Checklist set the order of the close tasks.
- Reconcile balance sheet accounts before you lock the period, not after.
What is the NetSuite record to report process?
Record to report, often shortened to R2R, is the finance process that turns daily transactions into reviewed financial statements. It starts when an invoice, bill, payroll journal or stock movement posts to the ledger. It ends when your managers, board and lenders receive numbers they can trust.
In NetSuite, most of this flow lives in one system. Sales, purchasing, inventory and payroll journals post to the same general ledger. Finance does not wait for files from other tools, and every balance can be traced back to the transaction behind it.
The month end close is one phase inside record to report. The close checks and locks a period. Record to report also covers the daily habits before the close and the reporting after it. Teams that only fix the close often find the same problems again next month, because the cause sits earlier in the flow.
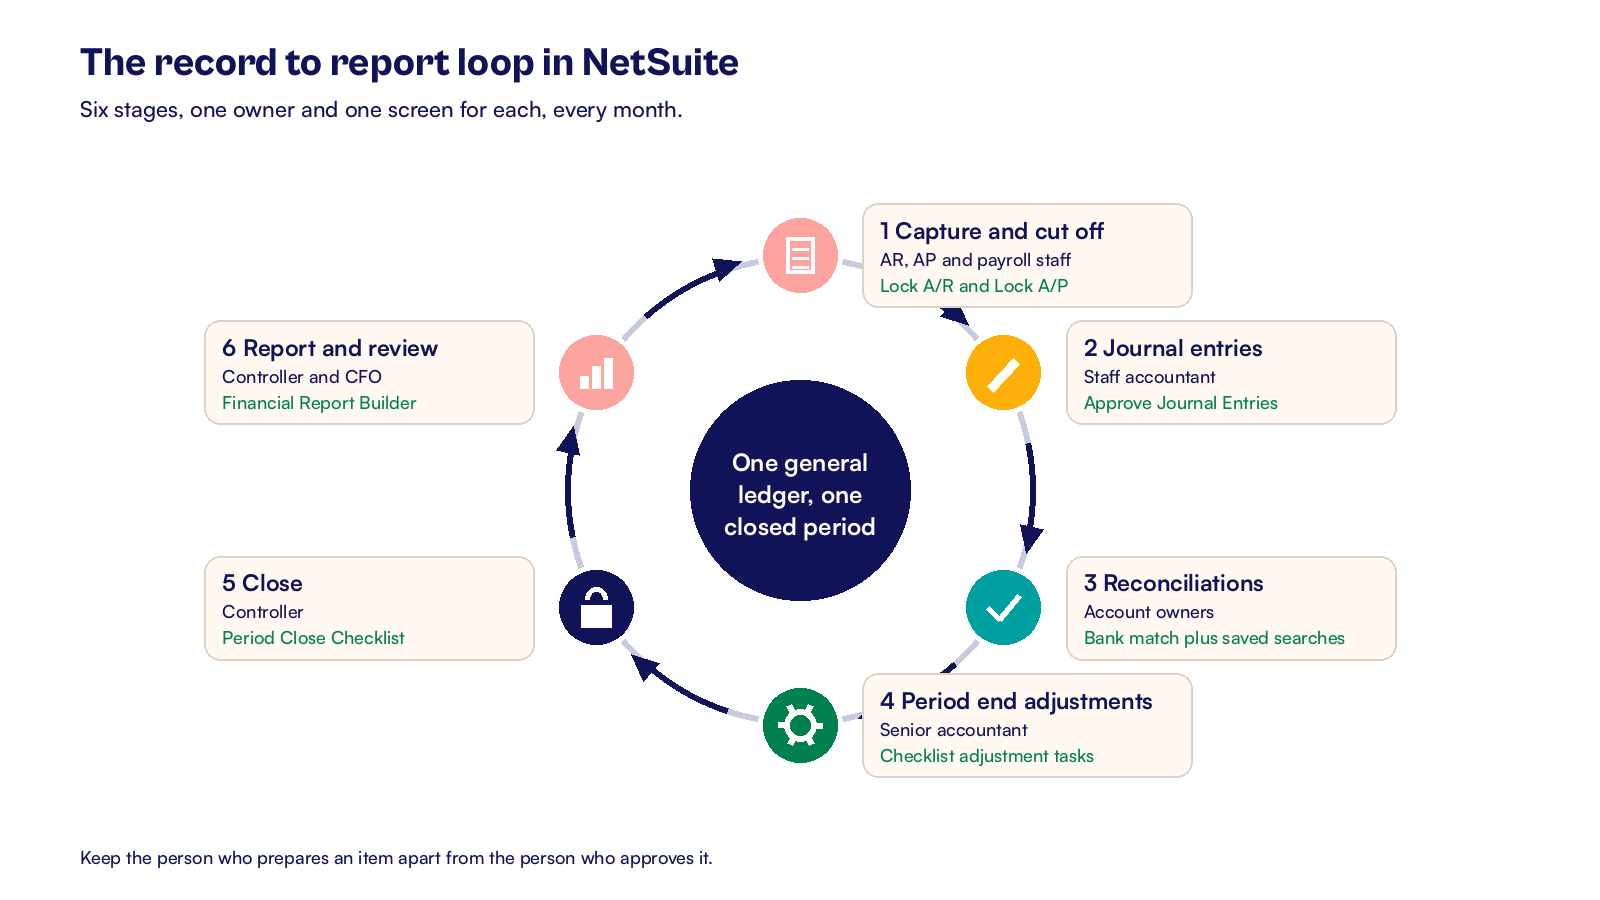
We split the work into six stages:
- Capture and cut off transactions.
- Post and approve journal entries.
- Reconcile accounts.
- Run period end adjustments.
- Close the period.
- Report and review.
Who owns each stage of record to report?
A clear owner for each stage stops the "I thought you had it" problem on the third working day. The table shows a typical split for a US company with a small finance team. Change the titles to fit your team, but keep the preparer and the approver as different people.
| Stage | Prepares | Approves | Where it happens in NetSuite |
|---|---|---|---|
| 1. Capture and cut off | AR, AP and payroll staff | Accounting manager | Invoices, vendor bills, payroll journals, Lock A/R and Lock A/P |
| 2. Journal entries | Staff accountant | Accounting manager or controller | Make Journal Entries and Approve Journal Entries |
| 3. Reconciliations | Account owner | Accounting manager | Reconcile Account Statement for bank accounts, plus saved searches for other balances |
| 4. Period end adjustments | Senior accountant | Controller | Adjustment tasks on the Period Close Checklist |
| 5. Close | Controller | CFO | Period Close Checklist and the Close task |
| 6. Report and review | Controller or reporting lead | CFO | Financial reports, saved reports and dashboards |
Small teams often give one person two roles. That works as long as nobody prepares and approves the same item. If you are getting ready for a SOX audit, our guide to SOX controls in NetSuite for pre IPO companies shows how auditors test this split.
How do transactions reach the ledger cleanly?
Stage 1 is where most close problems begin. A bill entered in the wrong period or an invoice dated a week late turns into a reconciling item later. Fixing it at the source takes minutes. Fixing it on day three of the close takes hours.
Set three habits for your subledger teams:
- Enter each transaction on the day it happens, with the right date and posting period.
- Agree a cutoff day for each team, for example accounts payable by the second working day.
- Lock each subledger when its team is done. In NetSuite, Lock A/R and Lock A/P stop new postings to those areas while the general ledger team finishes.
Locking is softer than closing. A locked period still accepts entries from roles with the Override Period Restrictions permission. Keep that permission to one or two people, and ask them to note why they used it.
If payroll runs outside NetSuite, agree the day the payroll journal arrives. Name the person who checks it against the payroll register before it posts.
For a US company, stage 1 also covers sales tax and 1099 data. The right tax code on each invoice and a complete vendor record save hours at year end. Our guide to the NetSuite order to cash process shows the sales side of this stage step by step.
How should journal entries be approved in NetSuite?
Stage 2 covers the entries your subledgers do not create. These are accruals, reclasses, allocations and corrections. They are made by hand, so they carry the most risk in the whole flow.
Start with the accounting preference Require Approvals on Journal Entries. Once it is on, entries from users without approval permission wait at Transactions > Financial > Approve Journal Entries before they post. If you want routing by amount, for example controller approval above $25,000, a SuiteFlow workflow can add that rule.
Good habits for every manual entry:
- Attach the support to the entry itself, such as the accrual workings or the invoice.
- Write a memo that someone new could follow six months later.
- Set accruals to reverse on the first day of the next period, so they clear without a second entry.
- Use allocation schedules and amortization schedules for repeat entries instead of keying them each month.
For entries that repeat with the same amount, such as a monthly rent accrual, a memorized transaction can create the entry on a schedule. Review each one once a quarter, because a stale amount repeats quietly every month.
System Notes record who created, changed and approved each entry. That trail answers most audit questions without extra work. It also shows which entries were edited after approval, which is worth a monthly look.
How do you reconcile accounts before the close?
Stage 3 proves that each balance sheet balance is right. A reconciliation compares the NetSuite balance with outside evidence, such as a bank statement, a loan schedule or a subledger report. Then it explains any difference.
Give every balance sheet account a named owner and a due day. Start with the accounts that move most:
- Cash. Match bank data and reconcile each bank account statement in NetSuite.
- Accounts receivable. Tie the A/R aging report to the general ledger balance.
- Accounts payable. Tie the A/P aging and any received not billed balance to the ledger.
- Inventory. Compare the inventory valuation report with the inventory accounts.
- Prepaids, accruals and deferred revenue. Agree each balance to its schedule.
- Intercompany balances, if you run more than one subsidiary.
What goes into a signed reconciliation?
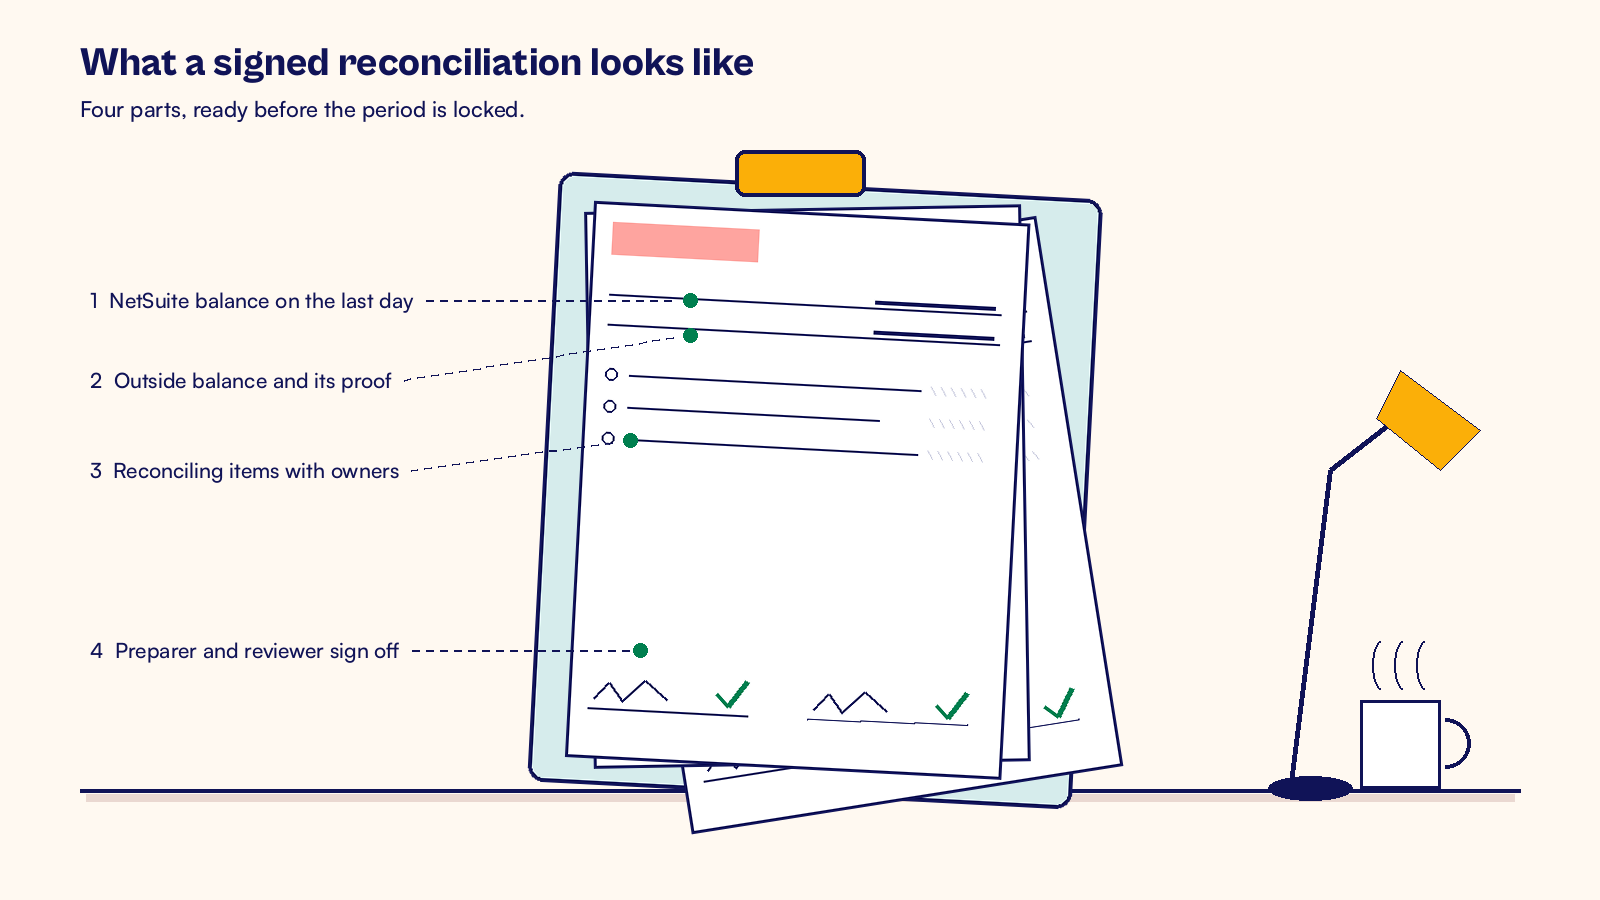
A good reconciliation has four parts, whoever prepares it:
- The NetSuite balance on the last day of the period.
- The outside balance, with the document that proves it.
- A list of reconciling items, each with a date, an amount and an owner.
- The preparer's name, the reviewer's name and the date each signed.
Keep the evidence with the period it belongs to. A saved search of reconciling items older than 60 days is a simple report for the controller to review each month. Old items rarely fix themselves, and they are a common starting point for audit questions.
Our NetSuite month end close checklist lists the evidence to keep for each reconciliation, so the file is ready before anyone asks.
Which period end adjustments does NetSuite run?
Stage 4 creates the system entries that only make sense at period end. NetSuite lists them as tasks on the Period Close Checklist, so you do not need a separate list. Which tasks appear depends on the features you use:
- Revalue Open Foreign Currency Balances, for open invoices and bills in other currencies.
- Recognize Revenue and Reclassify Revenue, if you use revenue recognition.
- Create Intercompany Adjustments and intercompany elimination, in NetSuite OneWorld.
- Calculate Consolidated Exchange Rates, so group reports translate each subsidiary correctly.
Each task needs its own permission. For example, the revaluation task needs Create level Currency Revaluation permission. Check those permissions before the first close, not during it.
Once the adjustments are posted, review the trial balance against last month and the budget. Agree a threshold, for example any change over $10,000 and 10 percent, and ask the account owner for a short reason. Our guide to NetSuite flux analysis shows how to set those thresholds and owners.
How do you close a period with the Period Close Checklist?
Stage 5 locks the result. Go to Setup > Accounting > Manage GL > Manage Accounting Periods, then click the Checklist icon for the period. The tasks are listed in the order NetSuite expects:
- Lock A/R, Lock A/P and, if you run payroll in NetSuite, Lock Payroll.
- Lock All once every subledger team has finished.
- Complete the adjustment tasks from stage 4.
- Create Period End Journals, if you use that feature.
- Assign and verify GL Audit Numbering, if you use that feature.
- Close the period.
Some tasks show a lock icon until the tasks before them are done. That fixed order is a control in itself, because nobody can close a period that skipped a step. Status icons show which tasks are complete, partly done or not started.
Closing a period stops all posting for its dates, by anyone. Reopening it should need the controller's approval and a reason in the notes. The checklist keeps the related system and user notes, so you can see who completed each task and when.
How do you report and review each month?
Stage 6 turns the closed ledger into reports people use. The income statement, balance sheet and cash flow statement run straight from the closed period in NetSuite. Use the Financial Report Builder to add the rows and columns your board pack needs, then save the report so it runs the same way next month.
A finance dashboard keeps the next close on track. Useful measures include days to close, open reconciling items by age and journals waiting for approval. You build these once with saved searches and reuse them every month.
What does a five day close calendar look like?
A close calendar helps everyone plan around these stages. A common pattern for a single US entity looks like this:
- Working day 1: subledger cutoff, bank matching and payroll journals.
- Working day 2: accruals and journal approval.
- Working day 3: reconciliations and period end adjustments.
- Working day 4: flux review, close and the first draft of the reports.
- Working day 5: board pack and review meeting.
Groups with several subsidiaries usually add a day for intercompany and consolidation work.
End each close with a short review meeting. Look at what slowed the close, which reconciliation had the oldest open items and which journal needed the most rework. Pick one cause and fix it before the next month starts.
Your next step is small. Write the six stages on one page with an owner for each. Turn on journal approval in your sandbox and test it with two users.
Then pick the three balance sheet accounts that took longest last month, and give each one an owner and a due day. That alone will make the next close calmer than the last.
At CuriousRubik, we map the record to report flow before we change any settings, so each fix has an owner and a test. Our NetSuite optimization team can review your close and set up the approvals, checklists and reports above. You can also see how we work with NetSuite customers in the United States.
Related reading
NetSuite Order to Cash Process: Flow and Best Practices
The sales side of record to report, from sales order to bank deposit, with an owner and a control for each step.
NetSuite Flux Analysis: Explain Variances in the Ledger
How to set thresholds and owners for the monthly variance review.
SOX Controls in NetSuite for Pre IPO Companies
How to prepare roles, approvals and change records for SOX audit sampling.